Indigo for 3ds Max
Indigo for 3ds Max is the integrated rendering solution for Autodesk 3ds Max developed by Glare Technologies.
For general support inquiries please contact support@indigorenderer.com.

Lenses experiment by Silverwing
Getting started
-
Ensure a supported version of 3ds Max is installed
A 64-bit version of 3ds Max is required.
-
Download and install Indigo
Download Indigo for your system here; if you are unsure about which version to download, please see this tutorial page.
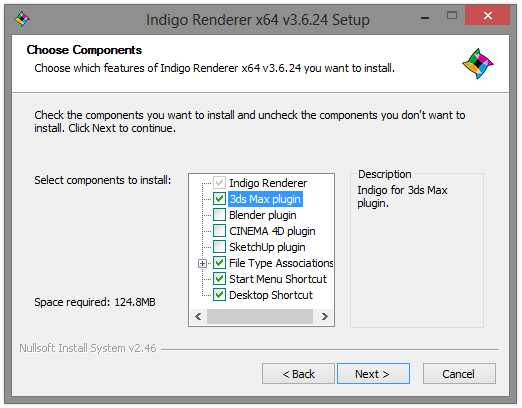
Upon running the installer, ensure that the "3ds Max plugin" component is selected for installation:
Continue with the normal install process for Indigo, after which the Indigo for 3ds Max installer will launch.
-
Install Indigo for 3ds Max
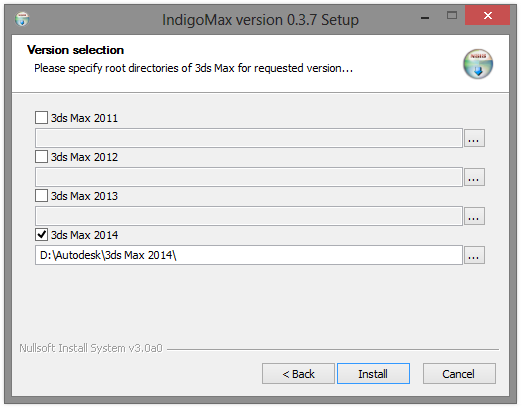
When the Indigo for 3ds Max installer launches, you will be prompted for the versions of 3ds Max you would like to use with Indigo:
If you encounter any problems installing Indigo for 3ds Max, please email us at support@indigorenderer.com.
-
Verify that Indigo for 3ds Max was correctly installed
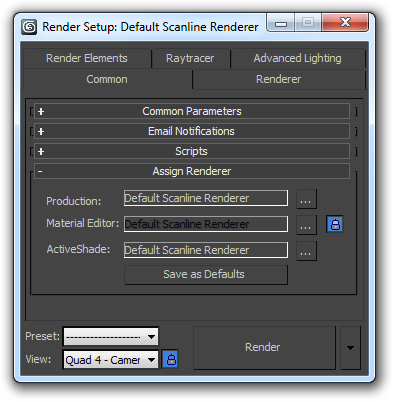
After the Indigo for 3ds Max installer has completed, restart 3ds Max. Enter the Render Setup dialog by pressing F10, and click the "..." button next to the Production renderer entry in the Assign Renderer roll-out:
From the list of renderers, select "Indigo Renderer" :

Indigo for 3ds Max is now installed and ready to use.
Basic usage tutorial
This tutorial follows on from the Getting Started guide, and covers the basic rendering and material editing workflow. Basic familiarity with 3ds Max is assumed.
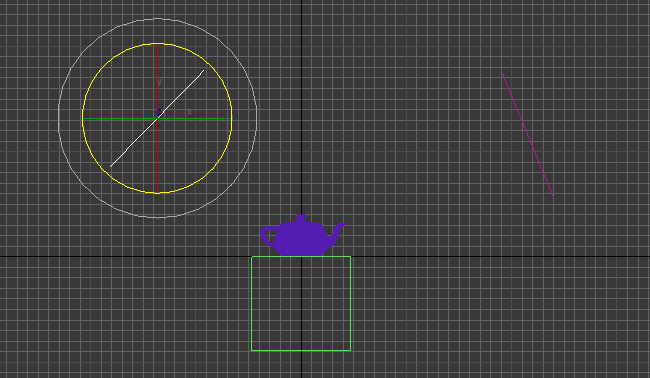
Rendering the basic scene geometry
We begin with an empty 3ds Max scene, and create a teapot on a pedestal as shown:
Before rendering, we must assign Indigo as the active renderer in the Render Setup dialog (keyboard shortcut: F10), as per the Getting Started guide.
If there are no light sources present, which is the case in a newly created scene, IndigoMax will use a sun/sky background to illuminate the scene.
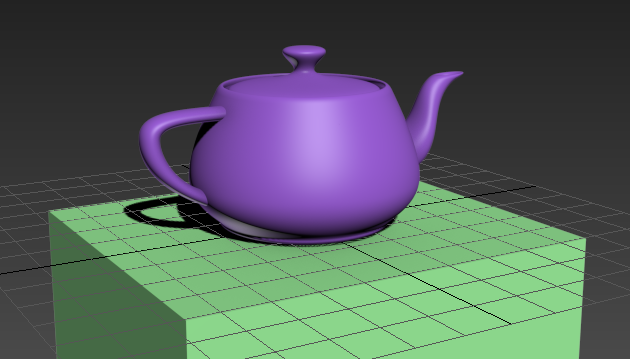
So if we now hit Render, we get an image like this:

Adding Indigo Material light sources
Next we will use our own light sources to illuminate the scene, instead of the default lighting. Lights in Indigo must have finite area, i.e. they cannot be point or directional lights; so we create the simplest possible surface, a quad patch, and point it at the teapot (two lights are shown here, illuminating from the sides):
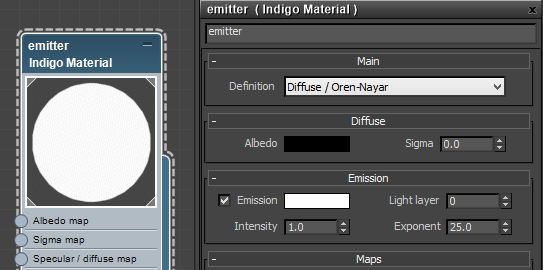
We must now create a material for this object, to specify an emission parameter. Open the Material Editor window and create a new Indigo Material, which we'll call "emitter".
In the emitter material settings, we'll set a black albedo colour (i.e. our light doesn't reflect any light) and a "white" emission colour:
Adding Phong Indigo Materials
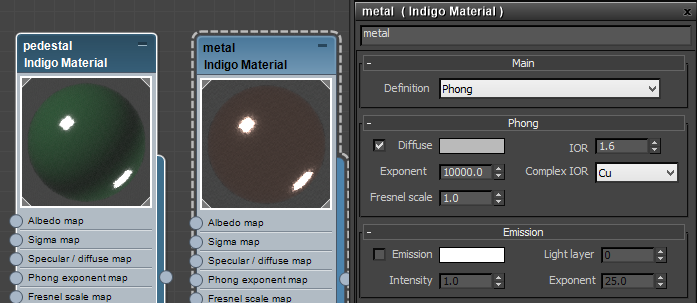
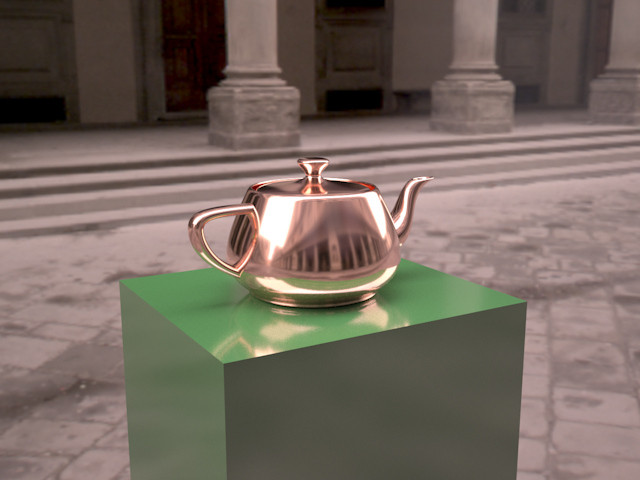
We'll also create two new Indigo Materials for the teapot and the pedestal. Change the teapot material definition to "Phong", then turn it into copper by choosing its chemical name "Cu" from the Complex IOR combo box. For the pedestal material we'll simply choose a dark green colour for the Phong albedo:
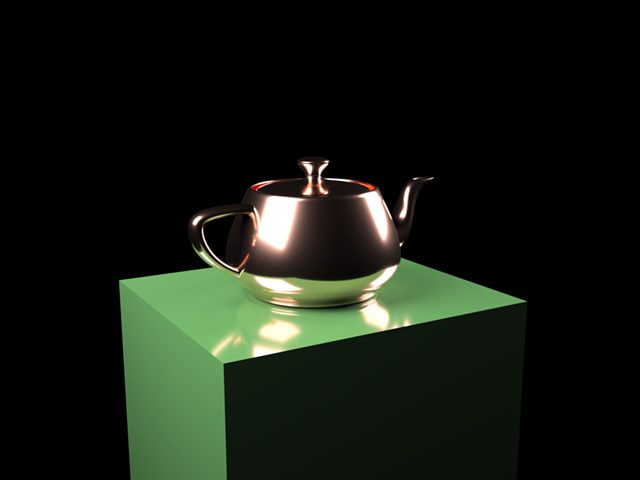
If we now apply the emitter material to the two light quads, and the teapot and pedestal materials to their respective models, we get the following rendered result:
Using specular materials
Another important material type is Specular, which simulates perfect reflection and refraction as governed by the physical Fresnel equations to produce realistic glass, water, acrylics etc.
The use of this material type is somewhat more complex than others, since objects with Specular materials must be closed (so as to produce a containing medium). For more information on this please see the manual page on physically-correct glass modelling.
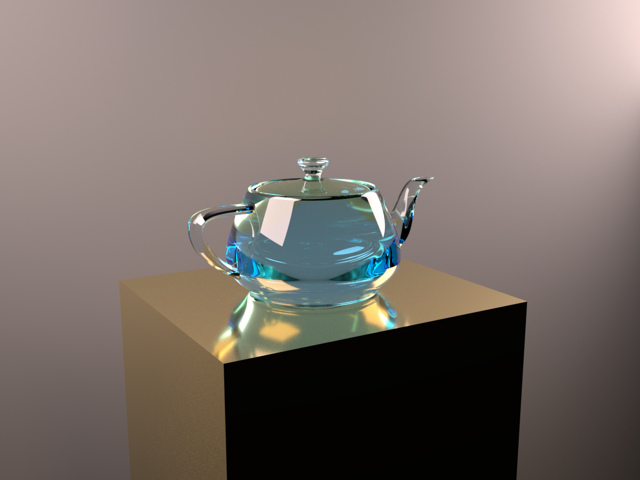
We'll turn the copper teapot material into a glass material by changing its material definition to "Specular / glossy transparent". To give the glass some colour, we sett its transmittance colour to a cyan, and increase the Strength a bit to make it darker / more dense:
To better illustrate the effect of the Specular material we put a while wall behind the teapot and pedestal, and change the pedestal to be made of gold:
Final notes
There is an increased amount of noise in the image, due to the complex light paths which can result from specular light interactions. Indigo's strictly unbiased rendering can have difficulty rendering such scenes cleanly using the normal sampling mode, and for these situations the MLT sampling mode can be of assistance.
HDR illumination is easy to set up, allowing for realistic and efficient illumination from distant light sources, as specified by Indigo Texture maps (illustrated here by the Uffizi Gallery HDR image by Paul Debevec):
This concludes the basic usage tutorial. For more information on using Indigo please refer to the rest of the manual and our Tutorials section, and our Forum contains a wealth of useful information (besides being a great community to interact with!).
IndigoMax configuration settings
IndigoMax supports 4 different basic configurations, or usage modes, to allow for greater workflow flexibility.
These configurations can be selected from the Render Setup menu, in the IndigoMax settings tab:

The 4 configurations work as follows:
- Regular - Renders until the halting time or samples per pixel has been reached. This is the default mode, suitable for rendering animations. To cancel a render, press cancel on the render view.
- Background - Renders continuously, scene changes do not affect the render unless restarted. Not suitable for rendering animations. To stop a render, press the Stop button.
- Interactive - Renders continuously, scene changes (geometry, transforms, materials, cameras) cause the render to restart immediately. Not suitable for rendering animations. To stop a render, press the Stop button.
- Export - Exports a scene to disk (location is specified in the advanced settings tab), and optionally launches the standalone Indigo application to render the scene after export.
Material settings
The Indigo Material in 3ds Max allows you to switch between the various basic material types Indigo supports, specifically Diffuse / Oren-Nayar for rough reflecting materials (e.g. matte paint, chalk), Diffuse transmitter for rough transmitting materials (e.g. lamp shades, curtains), Phong for smooth reflective materials (e.g. metals, plastic) and Specular / glossy transparent for water or glass (both smooth and frosted).
There are also three more complex Indigo material types, which use other Indigo materials as sub-materials: Blend, Coating and Double sided.
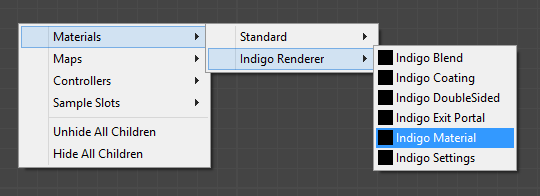
Indigo materials can be found in the Indigo Renderer sub-menu when creating materials:
Diffuse / Oren-Nayar
For more information about the Diffuse and Oren-Nayar materials, please click the links to see the relevant documentation pages.
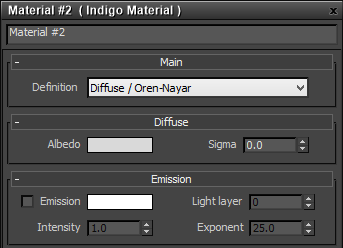
Diffuse material settings:
- Albedo - The material reflectance colour.
- Sigma - The roughness, where 0.0 is perfectly diffuse and 0.3 is very rough. For motion information on this parameter please see the Oren-Nayar documentation.
Diffuse transmitter
For more information about this material type please see the Diffuse transmitter material documentation.
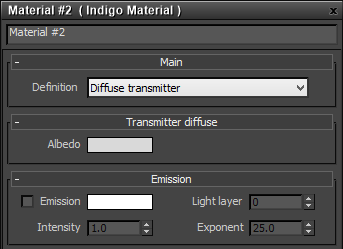
Diffuse material settings:
- Albedo - The material transmittance colour.
Phong
For more information about this material type please see the Phong material documentation.

- Diffuse - The colour of the diffuse base (or substrate).
- IOR - Controls the influence of the glossy coating; higher values produce stronger specular reflection. The IOR should be set to the real-world value for the material, if available; for example, the IOR of plastics is around 1.5 to 1.6, and oil paint binder has an IOR of around 1.5.
- Exponent - The exponent of the Phong specular highlight; larger values (e.g. 1000+) produce sharper highlights, while low values (e.g. 10) are quite rough.
- Complex IOR - Allows you to select from a list of lab-measured metal reflectance data. This overrides the IOR and Diffuse settings.
- Fresnel scale - Allows you to adjust the strength of the Fresnel reflection falloff.
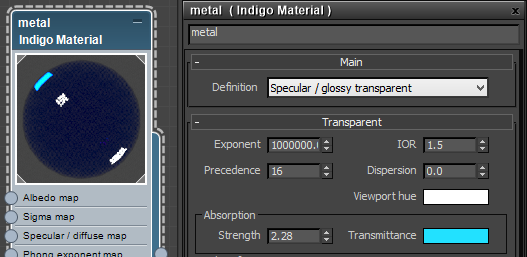
Specular / glossy transparent
For more information about the Specular and Glossy transparent materials, please click the links to see the relevant documentation pages.
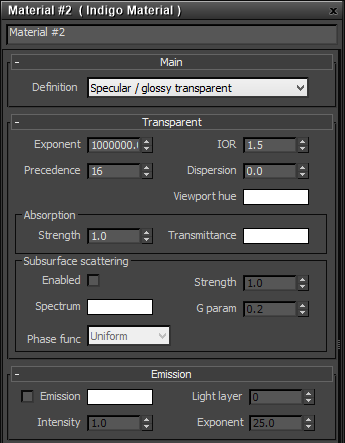
- Exponent - The Phong glossy reflection and refraction exponent. Set to a very large value (such as 1 million) for perfect specular / no glossiness.
- IOR - The index of refraction of the medium contained in this material; water has an IOR of ~1.33, diamond ~2.4.
- Precedence - The precedence of the medium inside this material. If there are multiple media occupying the same volume of space (e.g. ice in water in air), the one with highest precedence is used.
- Dispersion - Enables wavelength-dependent refraction (dispersion). Note that this can take significantly longer to converge (tip: use MLT).
- Absorption Strength - Scales the material transmittance colour.
- Transmittance - The material transmittance colour.
- Scattering Strength - Scales the scattering spectrum.
- Scattering Spectrum - Defines the (possibly wavelength-dependent) scattering spectrum. Note that this can take significantly longer to converge (tip: use MLT).
- Phase function - The phase function used to describe scattering in the medium.
- G param - The Henyey-Greenstein G parameter, which specifies the preference for forwards (G > 0), backwards (G < 0) or uniform (G = 0) scattering.
Blend
For more information about the Blend material, please click the link to see the relevant documentation page.
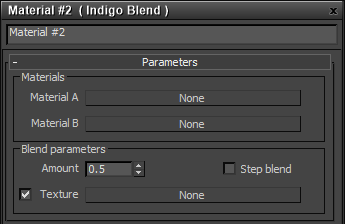
Blend material settings:
- Material A - The first material used for blending.
- Material B - The second material used for blending.
- Blend Amount - A constant blending factor; 1.0 means 100% of Material A is used, 0.0 means 100% of material B is used.
- Step blend - Disables partial blends so the result is either material A or B, depending on whether the blend amount (constant or map) is >= 0.5.
- Texture - Allows you to use a texture map to control blending.
Coating
For more information about the Coating material, please click the link to see the relevant documentation page.
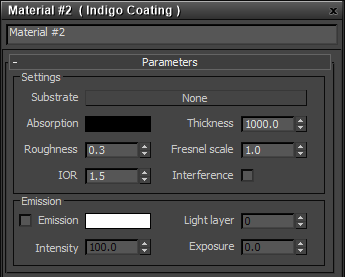
Coating material settings:
- Substrate - The base material which lies underneath the coating.
- Thickness - The coating thickness in millimetres.
- Roughness - Specifies the roughness of the coating, where 0 is perfect specular reflection and 1 is very rough.
- Fresnel scale - Allows you to adjust the strength of the Fresnel reflection falloff.
- IOR - The index of refraction of the coating medium.
- Interference - Enables the simulation of light interference in the coating, works best with thin coatings.
Double-sided
For more information about the Double-sided thin material, please click the link to see the relevant documentation page.
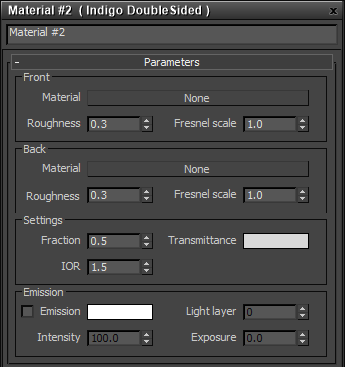
Front and Back material settings:
- Material - The material for the front- or back-facing side.
- Roughness - Specifies the roughness of the material's coating, where 0 is perfect specular reflection and 1 is very rough.
- Fresnel scale - Allows you to adjust the strength of the Fresnel reflection falloff.
- Fraction - The blending fraction between the front and back sides.
- Transmittance - The material transmittance colour.
- IOR - The index of refraction of the coating medium.
Environment settings
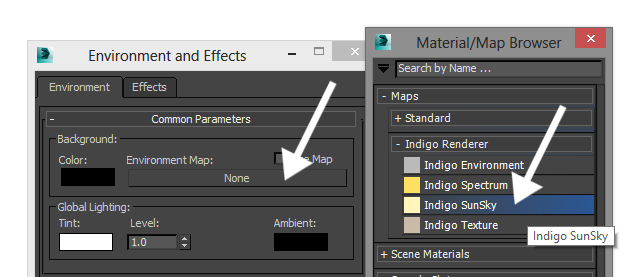
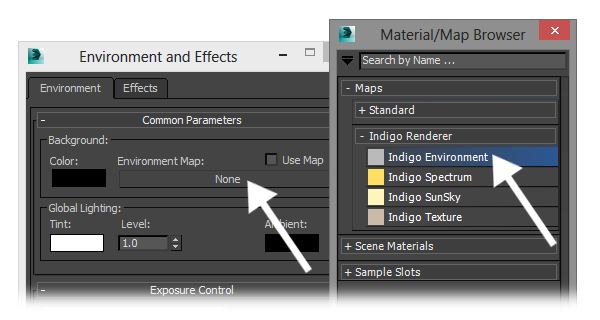
The Indigo environment settings can be set from the normal 3ds Max environment settings, allowing a choice of physically-based Sun/sky or environment map illumination in your scene.
For example, to create a Sun/sky environment, open the Environment Settings dialog (keyboard shortcut: 8) and select the Indigo SunSky option from the Indigo Renderer Maps list:
The Indigo Sun/sky and environment map settings are described in the following sections.
Physically-based Sun/sky
Indigo offers two Sun/sky models: either the classical Preetham Shirley Smits model, or the more accurate spectrally simulated model.
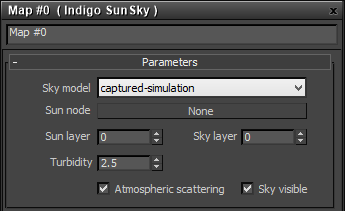
- Sky model - Selects the sun and sky model to use; the "classic" model is a standard physically-based sun and sky model, and the captured simulation is the directly simulated sun and sky introduced in Indigo 3.2.
- Sun node - Sets the light source which will act as the sun. This must be specified in order for the sun and sky model to work.
- Sun layer - The light layer index in which the direct sunlight contribution is stored.
- Sky layer - The light layer index in which the skylight contribution is stored.
- Turbidity - A higher turbidity corresponds to more overcast skies. Currently only affects the original sky model.
Image environment map
In this mode, an Indigo Texture (potentially in HDR) can be used as a background map to illuminate the scene. Usually latitude / longitude maps are saved in the compact .EXR format.
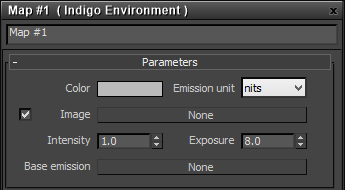
- Color - A constant background colour in the given emission units.
- Image - Allows you to specify an Indigo Texture map as an image source. For more information on setting up HDR environment maps, please see the subsection on using image environment maps.
- Intensity - A linear brightness scale factor.
- Exposure - An exponential brightness scale factor.
- Base emission - Allows you to specify a given spectrum map as the basic illumination component, e.g. 6500K blackbody for "white". The Image and Color scale with this base spectral colour.
Using image environment maps
In this section we'll cover using environment maps to illuminate a scene.
In a simple scene with the background clearly visible, open the Environment settings (keyboard shortcut: 8 key) and add a new Indigo Environment map:
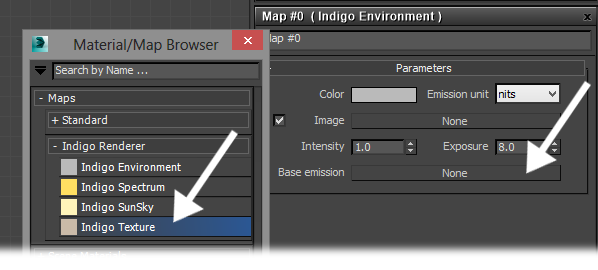
In the Indigo Environment map settings, create a new Indigo Texture map for the Image channel:
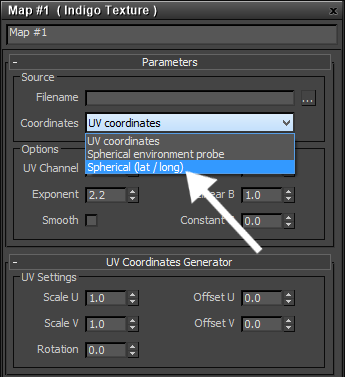
In the Indigo Texture map settings, the coordinates used should be set to "Environment (lat / long)" if you are using a normal HDR environment map:
This is for the usual latitude / longitude format environment maps, which look like this (example by Paul Debevec):

If we render this setup with a simple "teapot on a pedestal" scene, we get the following result: