Right-Click Menu
SkIndigo adds some features to the context-sensitive right-click menu in SketchUp.
Instancing
Instancing is a feature which allows many instances (or copies) of a mesh to be represented in the scene, while only actually storing the mesh once (thereby saving a lot of memory compared to straight-forward duplication).
There are two ways this can be achieved in SkIndigo:
-
Proxy Instancing
A proxy is a reference object that references a more complex object with a usually simpler copy, in order to keep the overall scene geometry low, while allowing the render geometry to stay high.
- Create the object you wish to copy, create a component out of it (right click, select 'Make Component') and name it “objectname”
- Create a new object to use as a proxy (a cube will do) and create a component out of it named “objectname_dummy”. It is important that it has the name of the original component followed by “_dummy”
- Copy and manipulate these dummies around the scene and on render they will be replaced by the original component.
-
Component Instancing
Copies of components in SketchUp will export using Indigo instances.
- Create the object you wish to copy, create a component out of it (right click, select 'Make Component'), with any name
- Copy and paste the component object.
Component copies will be exported as Indigo instances - each component copy will only use a small amount of memory.
UV Mapping
UV mapping is the process of modifying the texture map to fit the model. SkIndigo supports 4 UV maps per mesh face, which means you can have a the texture map aligned one way, the bump a different way, and the clip map another way on every surface in your scene.
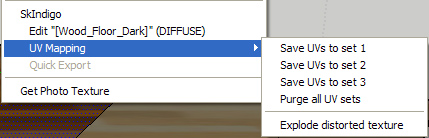
SketchUp has a basic UV positioning function that is used to manipulate the textures. It is also very important that the faces are facing the correct direction, if the UV mapping function is not listed in the Right-click SkIndigo menu, then try reversing the faces.
- Here is an example run-through on how to set a textured object with a differently positioned bump map
- Set the desired bump map as the albedo for positioning purposes.
- Set the bump map position with the SketchUp tools (Rightclick > Texture > Position)
- Rightclick > SkIndigo UV Mapping > Save UVs to set 2
- Change the albedo to the actual albedo and the the bump to the bump.
- Position the Albedo with the texture tools and save it as UV set 1.
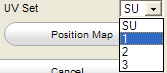
Selecting the UV set in the texture editor - In the SkIndigo Material editor, open the Texture Editor for the albedo and change the UV Set to 1. Set the bump map's UV Set to 2.
- Now it will use different texture positions for the albedo and bump map. Render to test.