Material Editor
This is where you can add the unique Indigo material settings to your objects so they behave realistically. You can find it via: Plugins -> SkIndigo Material Editor. See Indigo Materials for full information.

To work with an Indigo material, simply open up the SkIndigo Material Editor and apply any SketchUp material to an object. The painted material will be selected in the SkIndigo Material Editor. There are other ways to select a material for the SkIndigo Material Editor:
- Use "pick" from the SkIndigo Material Editor
- Select a face and in the right-click context-menu select the name of the material
-
List of Materials
Here is where all the textures applied in your SketchUp scene are listed, choose the desired one to start creating a material out of it.
-
Main Menu
Import Import a Indigo Material (.IGM). Use to bring in materials from the Material Editor. Export Export this material as an IGM or PIGM file which can be opened in the Indigo Material Editor or uploaded to the Indigo Material Database. UI This switches between the simple mode of SkIndigo, and the normal mode (See above). The simple view takes your settings and converts them as best as it can to normal settings. Normal mode is recommended. It is well worth your time to learn the Indigo Material Types as it allows you full control. Search Search the online database and download materials Pick Use a picker tool to select materials -
Preview Pane
Shows the current material, the Preview function replaces this with a rendered scene with the material placed on the chosen model (to the right). Make sure you stop the preview when you are finished previewing the material as this can greatly slow down your computer.
-
Material Type
Select the Material Types from this drop-down list. Each has its own attributes that are listed below. Assign Preset: Choose a preset material from the list provided. This will replace any of the current material settings. See Material Types.
-
Material Attributes
Here is where the material attributes live. They allow you to add more details to your material. The list will change depending on the Material Type selected. See Material Attributes.
-
List of Material Attributes
-
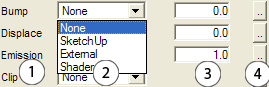
Map
Where the information is sourced from. Depending on which map type is selected, the "..." on the right will open different editors.
Constant A constant value. SketchUp Use the SketchUp texture or color. Texture Use an external (non-SketchUp) texture map. Shader Define a material using the Indigo Shader Language (ISL) -
Values
Changes the common value of this attribute. Usually a multiplier.
-
Map Editor
There are several editors that will open depending on the map set.
-
SkIndigo Texture Editor
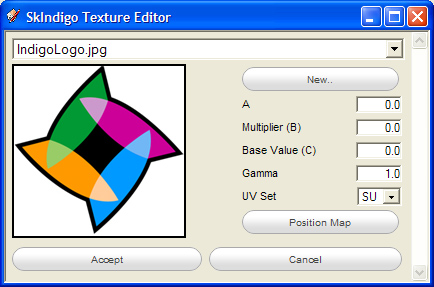
Position Map: First, select any number of faces in your model. Clicking this button will apply this texture to the selected faces so you can then position the texture using the SketchUp texture positioning tools. Once you have positioned the texture, you can save the UV set using the right-click context menu. Be sure to paint the desired material back to the selected faces before rendering.See Texture Maps
-
-
-
Emitter Attributes
See Base Emission and Emission
-
Media Attributes
See Internal Medium
-
Mesh Subdivision
See Subdivision