Indigo Manual > Rendering with Indigo
Render Tutorial
In this tutorial we will render an example scene that comes with Indigo to illustrate the basic render settings.
-
Start Indigo and click the Open button in the toolbar. Browse to the "testscenes" subdirectory in your Indigo Renderer installation, which on Windows is usually C:\Program Files\Indigo Renderer\testscenes.
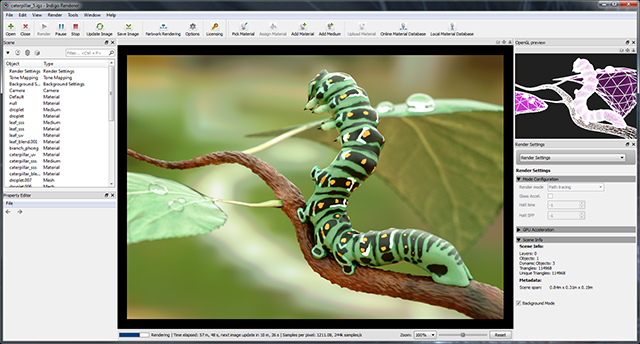
Open the "Caterpillar" example; this scene, by Paha Shabanov, showcases a number of Indigo's more complex features (e.g. displacement, subsurface scattering) and won a competition held on our Forum to be included with the Indigo distribution. -
This scene renders quite slowly using the default Bi-directional Path Tracing render mode, so let's set it to use the simpler, non-Bi-directional (i.e. single-directional) path tracing mode.
In the Render Settings view (on the right side of the image), from the drop-down menu at the top, select the "Render Settings". From the "Render mode" drop-down, select "Path tracing". -
Now we're ready to begin rendering. Hit the "Render" button on the toolbar, and Indigo will begin "building" the scene (preparing it for rendering).
For simple scenes, this build process will be nearly instantaneous, but for larger scenes (with many polygons, subdivision surfaces etc.), building the scene can take a little while. Indigo displays the build progress in the status bar, and you can see the full log by clicking the "Render Log" drop-down option from the Render Settings view. -
Once the scene has started rendering, the status bar will continually update with information about the render in progress.
Particularly relevant is the number of samples per pixel, which can be roughly thought of as the image quality; every so often (with decreasing frequency) the image will automatically update as it's rendering. You can update the image at any time either via the Update Image toolbar button or by pressing F5. -
After some minutes of rendering the "noise" (or graininess) in the image will go away, leaving a nice clean render:
-
Next we'll illustrate some of the imaging settings; these affect the appearance of the final image from the physical light computation Indigo performs, and can be adjusted without restarting the render.
In the Render Settings view, select "Imaging" from the drop-down at the top. The default setting for this scene is Camera tone mapping with the FP2900Z preset, and we can change its exposure (EV) and film ISO as with a real camera. If we switch the method to "Reinhard", Prescale to 2 and Burn to 3.6, we get the following result with less saturation, but also less "blow out" in the bright regions:
-
In the White Point section we see that the scene's default white point is the "E" preset. Typically we use a D65 ("daylight") white point, and selecting this option produces a noticeably "warmer" image:

-
Finally, let's save this image to disk; click the "Save Image" button in the toolbar, and either give the image a new file name or leave it as is.
Saving as PNG is generally recommended instead of JPEG unless the image will be directly uploaded to the Internet and needs to be compressed, since every time a JPEG image is saved the image quality is reduced (as it is a "lossy" format, as opposed to PNG which is "lossless" i.e. a perfect copy).