Render Settings
The render settings are only visible when a scene is open. There are several sub-sections selectable from the drop down control; these are documented in the following manual sections.
Imaging
"Imaging" collectively refers to the process of converting Indigo's internal physical light data into a normal RGB image which can be displayed on a computer screen.
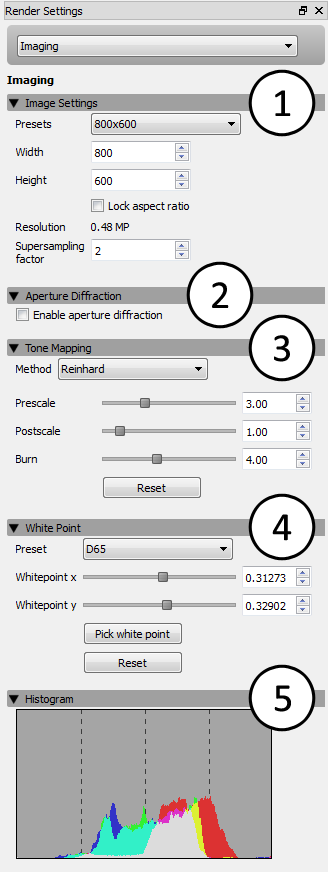
The following image shows the fully expanded Imaging view; we'll cover with numbered sections sequentially:
-
Image Settings
Here you can set the width and height of the image Indigo will render, along with the image super-sampling factor. The aspect ratio (ratio of image width to height) can be kept constant while editing either field by checking the "Lock aspect ratio" option.
If the super-sampling factor is greater than 1, then the image is rendered at a higher resolution internally and down-sampled before the render is displayed on-screen or saved to disk. This can help to reduce aliasing around high contrast edges and produce a sharper final image. Note that higher factors require a lot more memory (RAM), which scales by the square of the super-sampling factor: with a factor of 2, it will use 4x as much memory, with a factor of 3 it will use 9x as much, etc.
-
Aperture Diffraction
Aperture diffraction causes small bright light sources to "bloom" (diffract) through the simulated camera's aperture, creating a distinctive rainbow-coloured glow.
The exact shape of the diffraction pattern depends on the scene's aperture shape and obstacle map. For more information please see the camera documentation.
-
Tone Mapping
Tone mapping is the process whereby the high dynamic range (HDR) image internally stored by Indigo is converted to a low dynamic range (LDR) image for display on a normal computer screen.
This form of range compression is necessary because in real life, the sun is many thousands of times brighter than a dimly lit room, however on a standard computer screen we can only perceive approximately 200 brightness levels.
- Reinhard: The default "auto-exposure" mode, which handles images with very high dynamic range well, but can have lower contrast than the other modes.
- Camera: This mode allows you to select from a number of pre-defined camera response profiles, which accurately model the response of the camera's optics for various manufacturers and camera models.
- Linear: This mode is the simplest of all, providing only a linear scaling (or gain) factor and providing no dynamic range compression.
- Filmic: Like Linear, this tone mapper has only one control, but it responds quite differently with significantly less contrast at high brightness (Scale) values.
-
White Point
A white point (aka "reference white") is a colour which serves to define what "white" should look like in image. This is related to the human vision system's adaptation to different colour temperatures, and allows you to change how "warm" or "cold" an image appears.
-
Histogram
This section shows a histogram of the colours present in the image, which is useful to analyse the imaging settings for over-exposure or under-exposure.
Render Settings
-
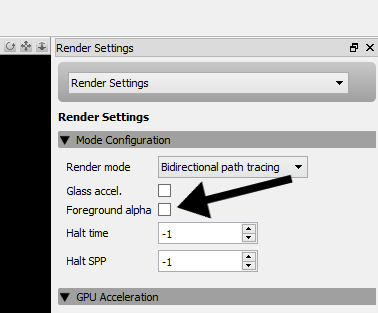
Mode Configuration
Render mode: This drop-down box allows you to select the render mode with which you'd like to render the scene. There are four normal rendering modes and two rendering modes aimed at compositing applications: alpha and material ID rendering.
If you are unsure which rendering mode to use a safe default is bidirectional path tracing, and there is also a render mode guide to help you choose.
Foreground alpha: This render mode sets background pixels to transparent (alpha zero). See Foreground Alpha for more details.
Halt time: Specifies the number of seconds, from the beginning of the render, until rendering is halted (instead of the usual unbounded rendering time).
Halt SPP: Specifies the number of samples per pixel (SPP) at which rendering is halted (instead of the usual unbounded number of samples per pixel).
-
OpenCL (CPU and GPU) Rendering
This section is only visible if a supported GPU (or CPU device, if CPU devices are enabled) was detected. Please see the System Requirements page for more information on GPU acceleration requirements.
Enable OpenCL Rendering: This checkbox specifies whether OpenCL should be used for rendering. Note that Indigo currently does not support bidirectional path tracing with OpenCL rendering, so enabling this will temporarily force single-directional path tracing.
Device Selection: This control allows you to select one or more devices to use for OpenCL rendering.
When a device is selected, some additional information about the device is listed below.
Max path depth: This sets the maximum number of bounces for a path. Setting this to a smaller number will speed up the rendering, but may result in complicated glass geometry rendering incorrectly. Likewise, increasing this setting will slow down the rendering.
-
Metadata
This section displays assorted information about the currently loaded scene.
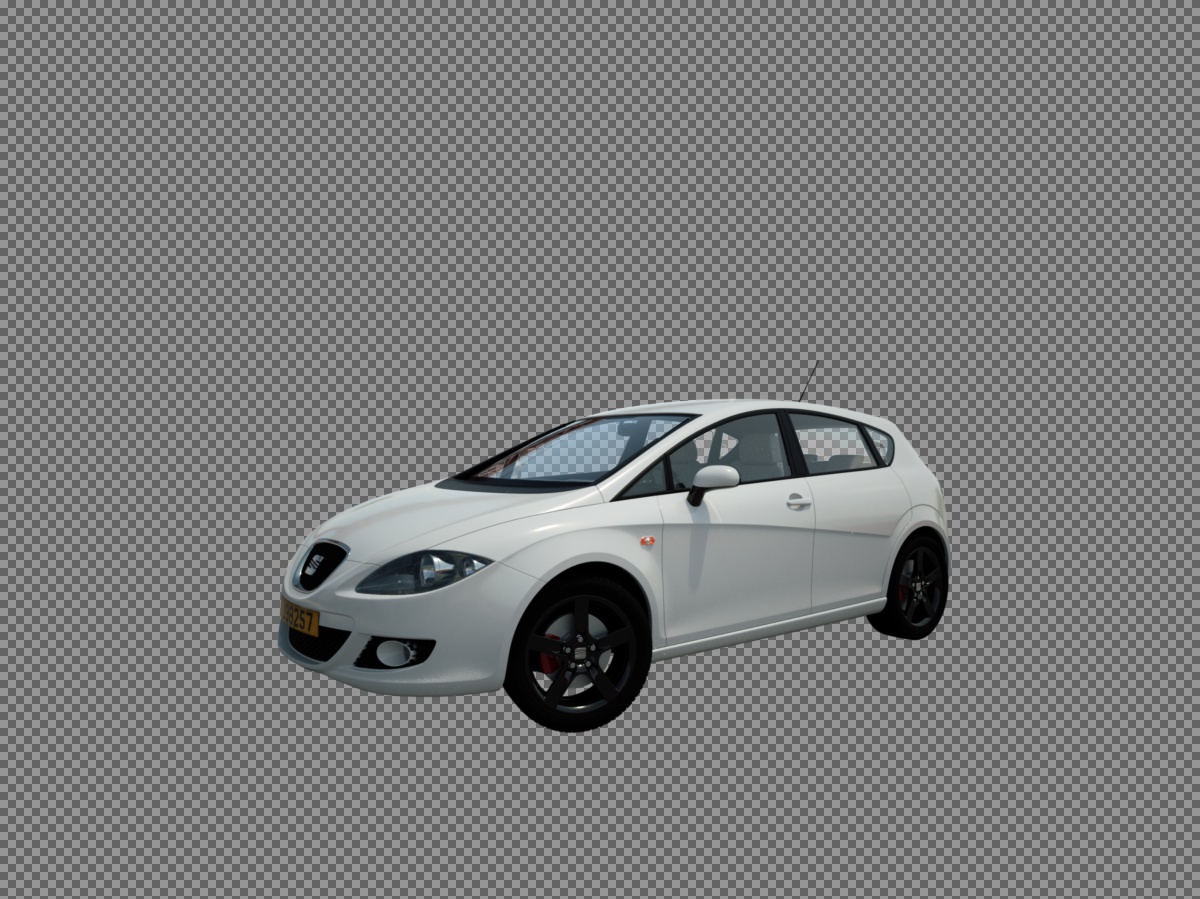
Foreground Alpha
Foreground alpha is a rendering mode that sets the pixel alpha (opacity) based on if the pixel is considered to be in the scene foreground or background.
If you enable foreground alpha, then when you save your image to PNG or EXR, or any format that supports an alpha channel, then transparency information will be included in the saved image. This allows for easy compositing of the objects in your scene over a background image.
For an example, see the Compositing with shadow pass tutorial.
Here is a render made with foreground alpha enabled. The grey checkerboard pattern indicates alpha zero (fully transparent) pixels.
The foreground alpha option is found in the render settings section:
Light Layers
The controls in this section allow you to view and modify the light layers present in the scene, and their contributions to the final image.
For each light layer present in the scene, a corresponding set of controls is available allowing you to adjust the overall gain and colour tinting, either via a standard RGB colour or using a colour temperature.

Example of light layer interface (click to enlarge). Click here to download this example scene.
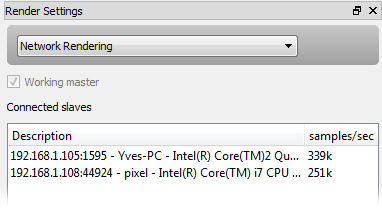
Network Rendering
The network rendering section of the Render Settings view lists all the connected slaves, and allows you to toggle whether or not the master should render as well.
Render Queue
The render queue lists the current batch of scenes to be rendered.
When loading a scene normally from inside the Indigo GUI, only a single item is added to the render queue, however multiple scenes can be added, with a halting condition (on rendering time, samples per pixel or both) to specify how long they should render for.

A Render Queue can be saved by clicking File -> Save Queue. A Indigo Queue file is automatically created when exporting animations from Indigo's 3D modelling package plugins. More information about saving and using Render Queues.
Render Log
While rendering, the Indigo core will output diagnostic information about the scene and the render status. This can be useful in diagnosing problems, and including a render log with an error report is always welcome.