Indigo Interface
A first look at Indigo
We'll begin with a "fully loaded" view of the main Indigo interface, showing almost all the available views while rendering a scene:
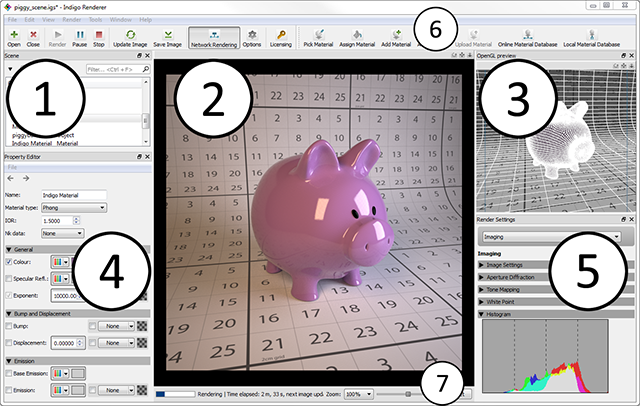
If you find this is displaying too much information at once, many of the views can be closed independently (and re-opened via the Window menu). Also note that this screenshot was taken on the Windows platform; other platforms may look slightly different.
We'll cover the numbered regions sequentially:
-
Scene view
Displays a list of the scene elements such as models, materials and renderer objects such as the camera, tone mapping and background settings.
-
Image view
This is where the rendering or rendered image is displayed. You can zoom and pan the image using the scrollwheel and by dragging the mouse, respectively. To view the image in full screen, go to View - Full screen, or hit Alt-Enter. The escape key will close the full screen mode.
-
OpenGL preview
Displays a simplified view of the scene using OpenGL, which generally provides much quicker visual feedback for real-time changes than the normal rendered view.
-
Property editor
When a scene element is selected in the scene view (Item 1) and it has editable properties, they can be looked at and edited here.
-
Render settings
Contains a number of tabs for setting pertaining to the imaging (tone mapping, white point etc.), rendering modes and light layers, plus sections with diagnostic information.
This view is only visible once a scene has been opened.
-
Toolbar
Provides buttons for quickly opening and closing scenes, starting and stopping renders, picking and assigning materials, and other commonly used functionality.
-
Status bar
The status bar displays information regarding Indigo's current state, i.e. whether it's waiting for a scene to be loaded, loading a scene or currently rendering.
When rendering it displays how long the current job has been running and how long until the next automatic image update, besides information on how many samples per pixel have been taken (a measure of image quality; see Principles of Physically Based Renderering for more information).
Toolbar
Many commonly used functions can be accessed from the toolbar for ease of access, and they can also be found in the various program menus.
|
|
Open Scene | Opens a scene in the current window. If a scene is already open, it will be closed (following a prompt). |
|
|
Close Scene | Closes the current scene, terminating the current render (following a prompt). Generally you'll want to save your rendered image before closing the scene. |
|
|
Render | Start rendering the current scene. Upon pressing this button, the scene will be built and then rendering will start. |
|
|
Pause Render | Pauses or resumes the current render, freeing up your computer's CPU for other tasks. You can resume the render at any stage. If you need to run a short, processor-intensive task while rendering, pausing and then resuming the render is effective (Indigo gives itself below normal priority by default, so this is normally not a problem). |
|
|
Stop Render | This stops the current render, freeing the used CPU and memory resources for the currently rendering scene. You can still tone-map and save the rendered image after the render has been stopped, but unlike with Pause, you can't easily resume rendering (see Resuming a render if you need to stop and later resume a render). |
|
|
Update Image | Indigo only updates the displayed image occasionally, to avoid wasting processing power on image updates which show little visible difference. However, you can at any time press the Update Image button (or the F5 shortcut key) to force an image update. |
|
|
Save Image | Once a rendered image is displayed, you can click Save Image to save it to disk in a number of standard formats such as PNG or JPEG, as well as the special Indigo Image (IGI) format for resuming the render later; the PNG format is recommended since it doesn't degrade the image quality as JPEG does. |
|
|
Network Rendering | Enables network rendering. See the Network Rendering section for more information. |
|
|
Options | Opens the options dialog. See the Options Dialog section for more information. |
|
|
Licensing | Use this button to open the Licensing window. You can use this to buy an Indigo licence, immediately removing the restrictions of the free version. See the Licensing section for more information. |
 |
Pick Material | This tool allows you to select a material by clicking on an object in the image view, whose currently applied material appears in the property editor. |
 |
Assign Material | This tool allows you to apply the currently selected material (in the scene view) to an object in the image view by clicking on it. |
 |
Add Material | Creates a new material in the scene view. |
 |
Add Medium | Creates a new medium in the scene view. |
 |
Upload Material | When editing a material, it uploads the material applied to the preview object together with the currently rendered preview image. The preview must be sufficiently clean (at least 200 samples per pixel) otherwise the upload will not succeed. |
 |
Online Material Database | Accesses the Indigo online material database, allowing you to download materials into your scene and the local material database. |
Render Settings
The render settings are only visible when a scene is open. There are several sub-sections selectable from the drop down control; these are documented in the following manual sections.
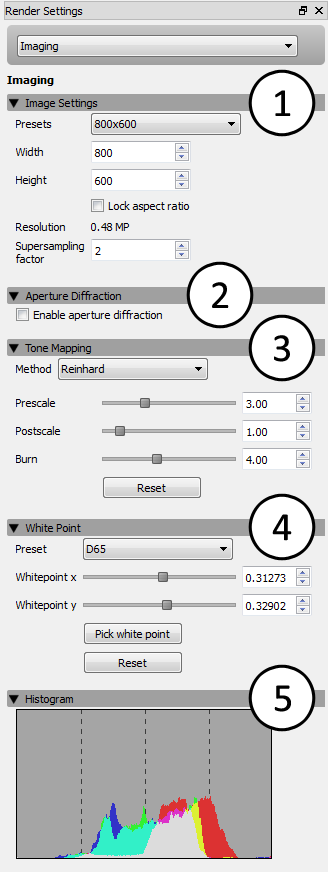
Imaging
"Imaging" collectively refers to the process of converting Indigo's internal physical light data into a normal RGB image which can be displayed on a computer screen.
The following image shows the fully expanded Imaging view; we'll cover with numbered sections sequentially:
-
Image Settings
Here you can set the width and height of the image Indigo will render, along with the image super-sampling factor. The aspect ratio (ratio of image width to height) can be kept constant while editing either field by checking the "Lock aspect ratio" option.
If the super-sampling factor is greater than 1, then the image is rendered at a higher resolution internally and down-sampled before the render is displayed on-screen or saved to disk. This can help to reduce aliasing around high contrast edges and produce a sharper final image. Note that higher factors require a lot more memory (RAM), which scales by the square of the super-sampling factor: with a factor of 2, it will use 4x as much memory, with a factor of 3 it will use 9x as much, etc.
-
Aperture Diffraction
Aperture diffraction causes small bright light sources to "bloom" (diffract) through the simulated camera's aperture, creating a distinctive rainbow-coloured glow.
The exact shape of the diffraction pattern depends on the scene's aperture shape and obstacle map. For more information please see the camera documentation.
-
Tone Mapping
Tone mapping is the process whereby the high dynamic range (HDR) image internally stored by Indigo is converted to a low dynamic range (LDR) image for display on a normal computer screen.
This form of range compression is necessary because in real life, the sun is many thousands of times brighter than a dimly lit room, however on a standard computer screen we can only perceive approximately 200 brightness levels.
- Reinhard: The default "auto-exposure" mode, which handles images with very high dynamic range well, but can have lower contrast than the other modes.
- Camera: This mode allows you to select from a number of pre-defined camera response profiles, which accurately model the response of the camera's optics for various manufacturers and camera models.
- Linear: This mode is the simplest of all, providing only a linear scaling (or gain) factor and providing no dynamic range compression.
- Filmic: Like Linear, this tone mapper has only one control, but it responds quite differently with significantly less contrast at high brightness (Scale) values.
-
White Point
A white point (aka "reference white") is a colour which serves to define what "white" should look like in image. This is related to the human vision system's adaptation to different colour temperatures, and allows you to change how "warm" or "cold" an image appears.
-
Histogram
This section shows a histogram of the colours present in the image, which is useful to analyse the imaging settings for over-exposure or under-exposure.
Render Settings
-
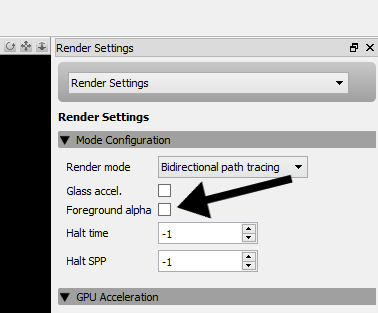
Mode Configuration
Render mode: This drop-down box allows you to select the render mode with which you'd like to render the scene. There are four normal rendering modes and two rendering modes aimed at compositing applications: alpha and material ID rendering.
If you are unsure which rendering mode to use a safe default is bidirectional path tracing, and there is also a render mode guide to help you choose.
Foreground alpha: This render mode sets background pixels to transparent (alpha zero). See Foreground Alpha for more details.
Halt time: Specifies the number of seconds, from the beginning of the render, until rendering is halted (instead of the usual unbounded rendering time).
Halt SPP: Specifies the number of samples per pixel (SPP) at which rendering is halted (instead of the usual unbounded number of samples per pixel).
-
OpenCL (CPU and GPU) Rendering
This section is only visible if a supported GPU (or CPU device, if CPU devices are enabled) was detected. Please see the System Requirements page for more information on GPU acceleration requirements.
Enable OpenCL Rendering: This checkbox specifies whether OpenCL should be used for rendering. Note that Indigo currently does not support bidirectional path tracing with OpenCL rendering, so enabling this will temporarily force single-directional path tracing.
Device Selection: This control allows you to select one or more devices to use for OpenCL rendering.
When a device is selected, some additional information about the device is listed below.
Max path depth: This sets the maximum number of bounces for a path. Setting this to a smaller number will speed up the rendering, but may result in complicated glass geometry rendering incorrectly. Likewise, increasing this setting will slow down the rendering.
-
Metadata
This section displays assorted information about the currently loaded scene.
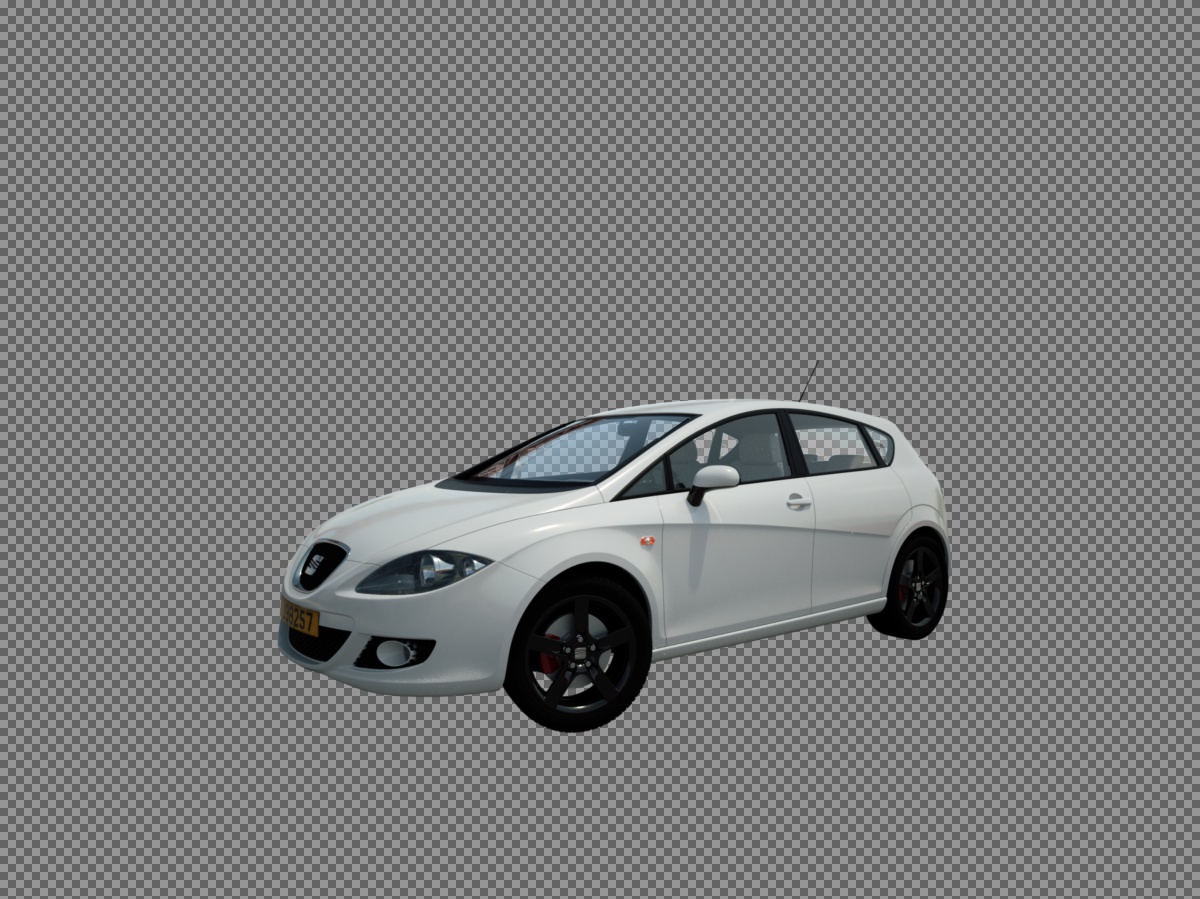
Foreground Alpha
Foreground alpha is a rendering mode that sets the pixel alpha (opacity) based on if the pixel is considered to be in the scene foreground or background.
If you enable foreground alpha, then when you save your image to PNG or EXR, or any format that supports an alpha channel, then transparency information will be included in the saved image. This allows for easy compositing of the objects in your scene over a background image.
For an example, see the Compositing with shadow pass tutorial.
Here is a render made with foreground alpha enabled. The grey checkerboard pattern indicates alpha zero (fully transparent) pixels.
The foreground alpha option is found in the render settings section:
Light Layers
The controls in this section allow you to view and modify the light layers present in the scene, and their contributions to the final image.
For each light layer present in the scene, a corresponding set of controls is available allowing you to adjust the overall gain and colour tinting, either via a standard RGB colour or using a colour temperature.

Example of light layer interface (click to enlarge). Click here to download this example scene.
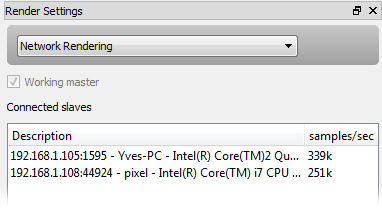
Network Rendering
The network rendering section of the Render Settings view lists all the connected slaves, and allows you to toggle whether or not the master should render as well.
Render Queue
The render queue lists the current batch of scenes to be rendered.
When loading a scene normally from inside the Indigo GUI, only a single item is added to the render queue, however multiple scenes can be added, with a halting condition (on rendering time, samples per pixel or both) to specify how long they should render for.

A Render Queue can be saved by clicking File -> Save Queue. A Indigo Queue file is automatically created when exporting animations from Indigo's 3D modelling package plugins. More information about saving and using Render Queues.
Render Log
While rendering, the Indigo core will output diagnostic information about the scene and the render status. This can be useful in diagnosing problems, and including a render log with an error report is always welcome.
Resuming a Render
While Indigo is rendering a scene, you can save the HDR buffer into an Indigo Image (file extension .IGI) to resume rendering later.
The Indigo Image stores all the information about a render in progress, so if the same scene is loaded again later (even after the rendering has been stopped and Indigo closed), the current rendering state can be fully restored using the IGI file.
To resume rendering a scene using a saved IGI, follow these steps:
Saving the render progress to an IGI
- Start rendering the scene.
- In the menu under "Render" click "Save IGI for resuming"
- Select the Indigo Image file type in the Save File dialog.
- Choose a file name for your IGI file, for example "test.igi", and click Save.
- You can now close Indigo.
Resuming
- When you wish to resume your render, open Indigo, and select "Resume Render from IGI" from the File menu.
- You will be prompted to locate the IGI file. Navigate to where you saved the IGI file, and press the "Open" button after selecting it.
- Indigo will read the location of the original scene file from the IGI. If it is no longer present, you will then be prompted to locate the original scene file, which the saved IGI was made with.
The IGI doesn't store information about the actual scene to be rendered (i.e. models and textures), only about the state of rendering it, so the scene file is still necessary to carry on rendering. You must open the same scene that you were rendering when you saved the IGI.
- You can confirm that the render resumed successfully by looking at the status bar – the time elapsed should include all the time spent rendering before the IGI was saved.
Indigo File Types
Indigo has several of its own file types for use specifically with Indigo.
| IGM | Indigo Material. Contains material information, but nothing else. |
| PIGM | Packed Indigo Material. Contains material information and anything else relevant to the material, such as textures. Can be unzipped with compression programs such as 7-Zip. This is the preferred format for distributing Indigo materials. |
| IGI | Indigo Image. Contains information saved from an Indigo render. Used for resuming renders. |
| IGS | Indigo Scene. Contains information about an Indigo scene saved on disk. |
| PIGS | Packed Indigo Scene. A self-contained archive with everything needed to render a scene, including all referenced models and textures etc. Can be unzipped with compression programs such as 7-Zip. This is the preferred format for distributing Indigo scenes. |
| IGQ | Indigo Queue format. Lets the user render multiple scenes after each other. The rendering process and halt settings of the different frames can be controlled in the Render Queue window. Used for rendering sequences and animations. |
| PIGQ | Packed Indigo Queue. A self-contained archive with everything needed to render a sequence of scenes, including all referenced scenes, models and textures etc. Can be unzipped with compression programs such as 7-Zip. This is the preferred format for distributing Indigo animations. |
Options Dialog
Options Dialog
The options dialog holds settings for the Indigo user interface and rendering options, networking configuration and OpenGL / input controls.
We'll cover these sections sequentially, corresponding to tabs in the options dialog:
-
Interface and Render

- Ask before quitting - Prompts the user for confirmation before exiting Indigo.
- Ask before closing scene - Prompts the user for confirmation before closing scenes.
- Default scrollwheel behaviour - By default, when scrolling the mouse wheel over a control which can itself scroll, it will scroll the contents instead of the parent window. When this option is unchecked, it instead scrolls over the control in the parent window without transferring focus.
- Theme - Changes the appearance of the Indigo user interface according to a selection of pre-defined themes.
- Information overlay - Displays information about the render in a small black rectangle in the bottom left corner of the image.
- Watermark - Displays an Indigo watermark in the bottom right corner of the image. Cannot be disabled in trial / unlicensed mode.
- Image save period - Automatically saves the image periodically, according to how many seconds are specified in the input field.
- Save Indigo Image - When automatically saving images, this option toggles whether or not a full Indigo Image is saved (rather than only a normal PNG).
-
Network

- Use network manager - Specifies that Indigo's network rendering should be coordinated by a Network Manager instead of running independently.
- Network manager hostname - The network computer name for the network manager; this cannot be "localhost" or "127.0.0.1" since the name is passed on to other computers, which will incorrectly try to connect to themselves, instead of the particular computer on which it was specified. Other computer names or IPs are valid.
- Use floating licence - Specifies that Indigo's licensing system should attempt to use a network floating licence instead of the normal per-computer licensing system.
- Do master search broadcast - If this option is enabled, Indigo will periodically search the local area network (LAN) for Indigo masters wanting rendering slaves.
-
OpenGL and Controls
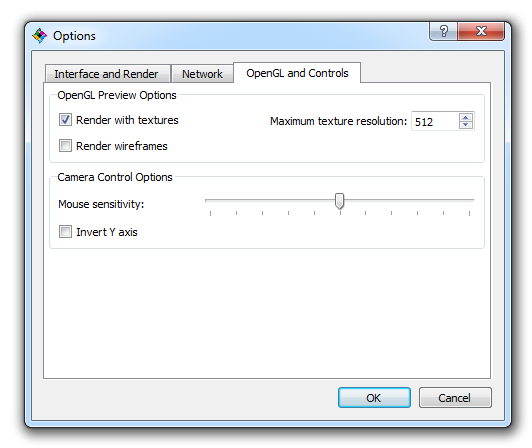
- Render with textures - Specifies whether the OpenGL preview should use texture maps from the scene. This uses extra GPU memory and increases scene loading time.
- Maximum texture resolution - Specifies the maximum width or height of textures used in the OpenGL preview. This is useful for reducing the amount of additional memory used by the OpenGL preview.
- Render wireframes - When enabled, the OpenGL preview shows the scene polygons using wireframe rendering, which can be useful to see the geometric detail in a model.
- Mouse sensitivity - The slider position specifies how fast the camera will rotate, pan or zoom when in real-time mode; further to the left means less sensitive, further to the right means more sensitive.
- Invert Y axis - If this option is enabled, mouse movement on the vertical (Y) axis will be inverted, i.e. moving the mouse up will make the camera look down.
-
Image Saving
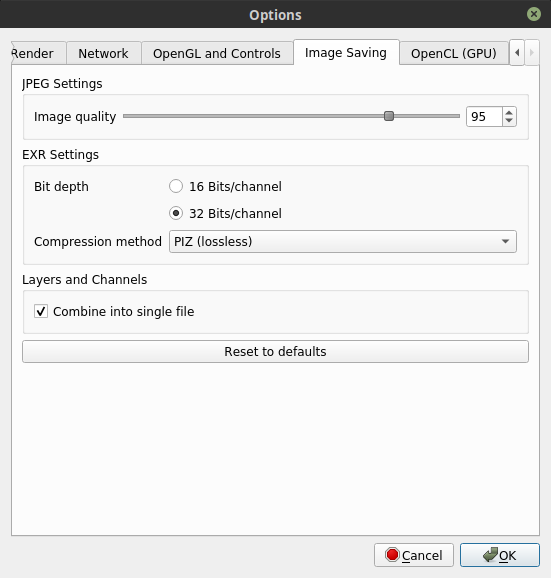
- JPEG Image Quality - Controls the quality setting for JPEG images saved by Indigo.
- EXR Bit Depth - Allows you to set the bit depth of saved EXR files.
- EXR Compression method - Choose the compression method used by when saving EXR files.
- Combine Layers and Channels into single file - When enabled, layers and channels are combined into a single EXR file, when disabled, Layers and Channels are saved separately to files suffixed with the layer/channel name.
-
OpenCL (GPU)

- Show CPU devices - When enabled, CPU devices are listed and available for OpenCL rendering.
Realtime camera control
Indigo's ability to dynamically edit scene data allows for realtime camera movement, which is very useful for final tweaking of a shot, or simply exploring the scene with full lighting.
There are two ways to effect realtime camera changes: via the on-screen buttons, and via keyboard and mouse controls.
Using the on-screen buttons
To use the on-screen buttons, click and drag on the buttons in the top-right corner of the main render and OpenGL preview windows:
 |
Rotate | Rotates the camera's view direction. |
 |
Pan | Pans the camera. |
 |
Dolly | Moves the camera forwards and backwards along the view direction. |
Using the keyboard and mouse
In the main render or OpenGL preview window:
| Hold Alt + left mouse button, drag | Rotate | Rotates the camera's view direction. |
| Hold Alt + middle mouse button, drag | Pan | Pans the camera. |
| Hold Alt + right mouse button, drag up/down | Dolly | Moves the camera forwards and backwards along the view direction. |
Holding the Shift key while performing these actions reduces the mouse sensitivity, for more fine-grained control.
Mouse sensitivity and inversion options can found in the Options dialog, in the "OpenGL and Controls" tab.